Before starting
this lesson, we review the first lesson.
In the first lesson, we explained how to sign in to start Windows 10 and how to shut
down. In this lesson, we will tell you about the main features and interface of
Windows 10, in which new features have been added.
Microsoft has
introduced all-new capabilities and new experiences in Windows 10. Ever since
Windows 10 was launched, Microsoft started inviting people and its users from
that very day so that more and more people can keep, choose and love Windows
10. Similarly, in 200 countries of Windows 10, about one billion people are
active users of Windows 10.
Windows 10 Complete Course (100% Free)
Explore to All Windows 10 Lessons:
Next Lesson
Main Features of Windows 10
Windows 10 is a personal computer operating system developed
by Microsoft. It was released on July 29, 2015, and has since become one of the
most widely used operating systems in the world. Windows 10 has a number of
features that make it an attractive option for both personal and business
users. Here are some of the key features of Windows 10:
- Start Menu: The Start Menu is back
in Windows 10, with a familiar look and feel. It provides quick access to your
most frequently used apps and files, as well as the ability to search for
anything on your PC or the web. - Cortana: Cortana is a virtual
assistant that can help you get things done on your PC. You can use Cortana to
set reminders, find information, and even send emails and text messages. - Microsoft Edge: Microsoft Edge is
the new web browser that comes with Windows 10. It’s designed to be fast,
secure, and compatible with modern web standards. - Virtual Desktops: Virtual Desktops
allow you to create multiple desktops on your PC, each with its own set of apps
and windows. This makes it easier to organize your work and keep your desktop
clutter-free. - Snap: Snap is a feature that
allows you to easily arrange and organize your open windows. You can snap
windows to the left or right side of the screen, or you can snap them to the
top or bottom. - Action Center: The Action Center
is a central location for all of your notifications, including alerts from apps
and system messages. You can access the Action Center by clicking on the icon
in the taskbar. - Continuum: Continuum is a feature
that makes it easy to switch between tablet and desktop mode on Windows 10
devices with detachable keyboards. - Xbox App: The Xbox app allows you
to play Xbox games on your PC, as well as connect with friends and watch live
streams. - Microsoft Store: The Microsoft
Store is a digital storefront where you can download apps, games, and other
content for your PC. - Windows Hello: Windows Hello is a
biometric authentication feature that allows you to sign in to your PC using
your face, fingerprint, or iris.
These are just a few of the many features that make Windows
10 a powerful and versatile operating system. Whether you’re a home user, a
student, or a business professional, Windows 10 has something to offer for
everyone.
1. Start
Menu
The Start Menu is a central hub for accessing apps, files,
and settings on Windows 10. It is a crucial component of the operating system,
and it has been significantly improved in Windows 10 compared to previous
versions of Windows.

For more information about creating the shutdown button in the start menu; you can review our post on “How to Create Shutdown Button in Start Menu/Taskbar for Windows 10?”
For more hands-on viewing of Videos, you can visit our YouTube channel on Windows 10 Playlist. Or you can click on the link below.
The Start Menu consists of two main parts: the left-side
panel, which displays live tiles for frequently used apps and shortcuts, and
the right-side panel, which provides access to all installed apps, settings,
and file explorer.
To open the Start Menu, simply click the Windows icon in the
bottom left corner of the screen or press the Windows key on your keyboard.
From here, you can quickly launch apps, access settings, and perform other
tasks.
One of the most notable features of the Start Menu in
Windows 10 is the ability to customize the live tiles. You can resize,
rearrange, and even remove live tiles, allowing you to create a Start Menu that
is tailored to your needs. Additionally, you can pin apps, files, and folders
to the Start Menu for quick access.
The Start Menu also provides access to the Cortana virtual
assistant, which can help you find files, launch apps, and perform tasks using
voice commands. Simply click the Cortana icon in the search bar or type a
command into the search bar to get started.
In addition to its functionalities, the Start Menu in
Windows 10 also provides a visually appealing interface, with customizable
themes and backgrounds. You can also choose to use a full-screen Start Menu,
which is particularly useful for users with touch-enabled devices.
Overall, the Start Menu in Windows 10 is a powerful and
convenient tool that can help you get the most out of your Windows 10
experience. Whether you’re launching apps, accessing settings, or performing
other tasks, the Start Menu is always there to help you get the job done.
2. Cortana
Cortana is a virtual assistant in Windows 10 that allows
users to interact with their computers using voice commands. It is integrated
into the operating system and can perform a variety of tasks, such as setting
reminders, opening apps, answering questions, and more.

To use Cortana, you need to activate it by clicking on the
search bar in the taskbar or pressing the Windows key + S. Once activated, you
can start speaking your commands and questions. Cortana will listen and respond
to you in a natural and conversational manner.
One of the main features of Cortana is its ability to
understand natural language and provide relevant information based on your
search queries. For example, you can ask Cortana for the weather, and directions,
or to perform a web search. You can also set reminders, create calendar events,
and send emails using Cortana.
Another feature of Cortana is its integration with
Microsoft’s personal assistant app, Microsoft To-Do. You can use Cortana to
create and manage tasks, and it will automatically sync with Microsoft To-Do,
making it easy to keep track of your to-do list.
Cortana can also be used to control your Windows 10 device
hands-free, using voice commands. You can use Cortana to open apps, adjust
settings, and more, without having to physically interact with your device.
Overall, Cortana is a useful and convenient tool for Windows
10 users. It allows you to interact with your computer in a more natural and
intuitive way and can help you stay organized and on top of your tasks. If
you’re new to Windows 10, it’s definitely worth taking some time to explore and
get familiar with Cortana and its features.
How to Use Cortana?
Cortana is very easy to use, you need to have a Microsoft account to use it, here are some steps, follow them and you will be able to use Cortana.
For more information about Microsoft Accounts, you can review our post on “How to Create a Microsoft Account?”
1. First of all, after opening Cortana, click on the three dots on the top left side and click on Settings to sign in with your Microsoft account. See the picture below.

2. Select Microsoft Account sign-in option then click the Continue button.

3. Now, you ask Cortana
3. Microsoft
Edge
Microsoft Edge is the default web browser in Windows 10. It
was released in 2015 as a replacement for Internet Explorer and comes with
several new features and improvements. Here’s how you can use Microsoft Edge in
Windows 10:
Open Microsoft Edge: You can open Microsoft Edge by clicking
on its icon on the taskbar or by searching for it in the Start menu.
Browsing the web: Once you have opened Microsoft Edge, you
can start browsing the web by typing a URL in the address bar or by using the
search bar. Microsoft Edge also comes with a new feature called “Cortana
integration” that allows you to search the web using voice commands.
Tabs and Browsing History: Microsoft Edge allows you to open
multiple tabs at the same time, making it easier to switch between different
websites. You can also access your browsing history by clicking on the
“History” icon in the upper right corner of the browser.
Reading View: Microsoft Edge has a “Reading View”
feature that allows you to view articles in a clutter-free environment. This
feature removes all ads, sidebars, and other distractions, making it easier to
focus on the content.
Extensions: Microsoft Edge also supports extensions, which
are small programs that add new features to the browser. You can download and
install extensions from the Microsoft Store.
InPrivate Browsing: Microsoft Edge also has a
“InPrivate” mode that allows you to browse the web without saving
your history, temporary files, or cookies. This mode is useful for people who
want to keep their browsing private.
4. Virtual
Desktops
Virtual Desktops is a feature in Windows 10 that allows you
to have multiple desktops on a single computer. This can be useful for
organizing your work and separating different tasks into different virtual
desktops. Here’s how to use Virtual Desktops in Windows 10:
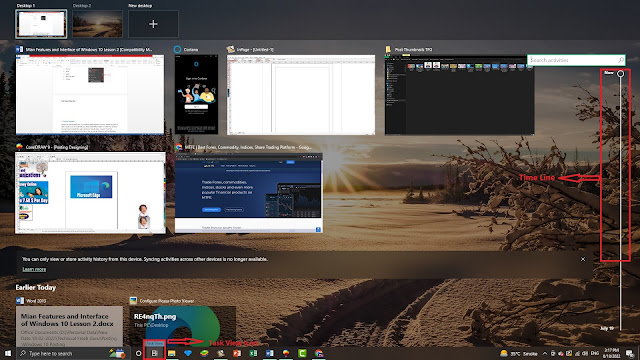
Open Task View: To open the Task View, click on the Task
View button on the taskbar or press Windows Key + Tab.
Create a New Desktop: To create a new desktop, click on the
New Desktop button in the bottom-right corner of the Task View.
Switch Between Desktops: To switch between desktops, click
on the desktop you want to switch to in the Task View or press Windows Key +
Ctrl + Left or Right Arrow.
Close a Desktop: To close a desktop, right-click on its
thumbnail in the Task View and click on Close this Desktop.
Move Windows Between Desktops: To move a window from one
desktop to another, right-click on its thumbnail in the Task View and click on
Move to Another Desktop.
Virtual Desktops can be a great tool for organizing your
work and separating different tasks into different desktops. This can help you
keep your work environment clean and uncluttered, making it easier to focus on
the task at hand.
5. Snap
Snap is a feature in Windows 10 that allows you to arrange
and resize multiple windows on the screen. With Snap, you can snap one window
to the left or right side of the screen, taking up either a half or a quarter
of the screen, and have another window open on the other side.
To use Snap in Windows 10, follow these steps:
Open two or more windows you want to snap.
Click and hold the title bar of one of the windows and drag
it to the side of the screen you want it to snap to.
Release the mouse button and the window will snap to that
side of the screen, taking up either a half or a quarter of the screen.
To snap another window to the other side of the screen,
click and hold the title bar of that window and drag it to the other side of
the screen.
With Snap, you can easily arrange and resize multiple
windows on the screen to make the most of your screen real estate. It’s a handy
feature to use when you need to compare or reference multiple windows while
working on a blog post with 2500 words.
6. Action
Center
The Action Center in Windows 10 is a centralized
notification center that displays all of your notifications, alerts, and quick
actions in one place. The Action Center provides quick access to frequently
used settings and shortcuts, as well as the ability to manage and clear
notifications.
To use the Action Center in Windows 10, follow these steps:
Click the Action Center icon in the taskbar (the icon is a
speech bubble with a white flag).
The Action Center will appear, displaying all of your
notifications, alerts, and quick actions.
To interact with a notification, click on it.
To access frequently used settings and shortcuts, click on
the “Expand” button in the Action Center.
To manage notifications, click the “Clear all”
button to clear all notifications, or click the “Clear” button next
to each individual notification.
The Action Center is a useful feature for managing notifications
and quick actions, especially when working on a blog post with 2500 words. You
can use it to quickly access frequently used settings and shortcuts, such as
the Wi-Fi or Bluetooth settings, or to clear notifications that may be
distracting you from your work.
7. Continuum
Continuum is a feature in Windows 10 that adapts to the way
you’re using your device. It optimizes the experience for either a touch-based
interface or a traditional keyboard-and-mouse interface, depending on whether
you’re using a 2-in-1 device like a tablet or laptop, or desktop computer.
To use Continuum in Windows 10, follow these steps:
Connect your 2-in-1 device to a keyboard, mouse, or monitor.
Windows 10 will automatically detect the change and prompt
you to switch to desktop mode.
Choose “Switch” to switch to desktop mode, or
choose “Stay in tablet mode” to remain in tablet mode.
To switch back to tablet mode, simply disconnect your
keyboard, mouse, or monitor.
With Continuum, you can easily switch between desktop mode
and tablet mode, depending on how you’re using your device. This makes it an
ideal feature for working on a blog post with 2500 words, as you can use a
keyboard and mouse for typing and editing, and then switch to tablet mode for a
more touch-based experience when reviewing or making notes on your post.
8. Xbox App
The Xbox app in Windows 10 is an app that allows you to play
Xbox games and connect with your Xbox Live friends on your Windows 10 PC. The
Xbox app also allows you to share game clips and screenshots and provides
access to game streaming and Xbox Game Pass.
To use the Xbox app in Windows 10 for your blog with 2500
words, follow these steps:
Open the Xbox app from the Start menu or the Windows Store.
Sign in with your Microsoft account to access your Xbox Live
profile.
You can use the Xbox app to connect with your Xbox Live
friends, view your game activity feed, and share game clips and screenshots.
If you have an Xbox One, you can use the Xbox app to stream
games from your Xbox One to your Windows 10 PC.
You can also access Xbox Game Pass, a subscription service
that provides access to a library of over 100 Xbox games, and download and play
them on your Windows 10 PC.
The Xbox app in Windows 10 provides a convenient way to
connect with your Xbox Live friends and play Xbox games on your Windows 10 PC.
While it may not be directly related to your blog with 2500 words, it can still
provide a way to take a break from your work and enjoy some gaming.
9. Microsoft
Store
The Microsoft Store is a digital distribution platform in
Windows 10 for downloading and purchasing apps, games, movies, music, and more.
It offers a wide range of products and services, including both Microsoft and
third-party content.
To use the Microsoft Store in Windows 10 for your blog with
2500 words, follow these steps:
Open the Microsoft Store from the Start menu.
Browse or search for the app, game, movie, or other content
you want to download or purchase.
Click the item you want to download or purchase, and then
click the “Get” or “Buy” button.
If you’re downloading a free app or game, click the
“Get” button and follow the on-screen instructions. If you’re
purchasing a paid app or game, click the “Buy” button, enter your
payment information, and follow the on-screen instructions.
Once the download or purchase is complete, you can launch
the app or game from the Microsoft Store or the Start menu.
The Microsoft Store in Windows 10 provides a convenient and
easy way to find and download the apps, games, and other content you need for
your blog with 2500 words. Whether you need a specific app to help you write,
edit, or publish your blog, or you want to take a break from your work and play
a game, the Microsoft Store has you covered.
10. Windows
Hello
Windows Hello is a biometric authentication feature in
Windows 10 that allows you to sign in to your device or apps using your face,
fingerprint, or iris instead of a password. It provides a secure and convenient
way to access your device and apps, without having to remember a password.
To use Windows Hello for your blog with 2500 words, follow
these steps:
Set up Windows Hello: Go to Settings > Accounts >
Sign-in options, and select either “Windows Hello face,”
“Windows Hello fingerprint,” or “Windows Hello iris” as
your sign-in option. Follow the on-screen instructions to set up Windows Hello.
Sign in with Windows Hello: When you turn on your device or
lock your screen, you’ll see the Windows Hello sign-in option. Look at your
device’s camera, place your finger on the fingerprint reader, or look at the
iris scanner to sign in.
Use Windows Hello with apps: Some apps and services, such as
Microsoft Edge, support Windows Hello for a more secure and convenient sign-in
experience.
Windows Hello provides a convenient and secure way to access
your device and apps for your blog with 2500 words. With Windows Hello, you can
sign in to your device or apps quickly and easily, without having to remember a
password. This can help you get more work done and spend less time managing
passwords.
The interface of Windows 10
Windows 10 is a powerful graphical user interface
operating system and it is used on different devices. One of the users works with a keyboard and mouse
and the other on Tablet mode works with a touch screen. The first desktop
screen is below:

Back in our Getting Started of Windows 10 lesson 1, we told you that when you turn on the
computer, after signing in to Windows, the desktop screen is shown in front of
you. Here we are talking about the complete interface of Windows 10. The
Desktop interfaces are below:
- Desktop Shortcuts
- Start Button
- Search bar
- Cortana
- Task view
- Folder explorer
- Quick launch
- Taskbar
- Feeds Task Manager
- Meet Now
- Speaker (voice control)
- Time/Date
Windows 10 Complete Course (100% Free)
Explore to All Windows 10 Lessons:

.jpg "5 Proven Ways to Make Money Online in 2023")


